fbpx

Introduction

The GoPiGo is getting a new OS and it’s one that will change everything! Meet GoPiGo OS 🙂

GoPiGo OS is more flexible than ever! You can:

  • choose to connect to the robot using its WiFi access point OR  you can connect it to your local WiFi network
  • choose to connect through a web interface offering Bloxter and JupyterLab, OR  you can access the Raspberry Pi desktop that you may be familiar with.

GoPiGo OS offers the same Bloxter as before and an updated JupyterLab implementation.

Without further ado, you can download it for free right now!

Note: GoPiGo OS supports the GoPiGo3 exclusively.

Note on first boot timing.

Booting up GoPiGo OS for the first time will take a little bit of time. (About 2 minutes) The robot needs to configure a few things when it first comes to life, and that includes a couple of reboots.

You will notice the antenna LED turn green, and a few seconds later it will turn off and the power LED will start blinking again. This is normal behavior. The robot will finish rebooting and you will be able to connect to it the second time the antenna LED shows up green.

Features

WiFi Connectivity

On the main page, you will notice a WiFi icon. You can switch GoPiGo OS from being its own access point, to being connected to your local WiFi.

Main Page

To connect GoPiGo to your network, supply your WiFi information, the network name, and the password.

Click the “Set WiFi Connection” button.

The antenna LED will turn off while it attemps to connect with the new information.

Adding WiFi connection info

Once it is connected to the network, the robot antenna LED will be yellow. 

If the connection fails, for example there’s an error in the password, then the antenna will be green again and you will have to connect to the robot access point, as if it was a fresh boot-up.

This is explained in this screen.


Connecting to a local WiFi Network.

If you want to go back to Access Point mode

  • Click on the WiFi icon from the main page
  • Click “Set as Default Access Point” mode. 

Or if you need to jump to another WiFi network, you can also do it from here.

Going back to Access Point mode

Here's How to Interpret the Antenna LED Colors

The antenna LED is your guide to knowing what’s happening with your GoPiGo.  This short guide will help you interpret its signal.

  1. Green:  broadcasting an access point, and ready to accept connections
  2. Blue: broadcasting an access point, and at least one person is connected
  3. Yellow: not broadcasting an access point, and the robot is directly connected to the surrounding wifi. You may be able to connect to it via its hostname, or you can connect to it by using its IP address. 
  4. Off: not broadcasting an access point, and not connected to any network. This can be a temporary state while booting up, or more permanent if you are using an Ethernet cable to reach the robot.
Green antenna LED showing GoPiGo broadcasting its access point.

Get Some Earbuds and Listen

The robot will let you know which IP address it got from the network if you plug earbuds directly in the Pi audio jack.

Make sure to start listening when you switch modes. 

If it is in Access Point mode, it will confirm this by giving its IP address as 10.10.10.10

Otherwise it will give you the IP address it received from the network.

Speaker for Raspberry Pi

Advanced Things to Know about the WiFi Feature

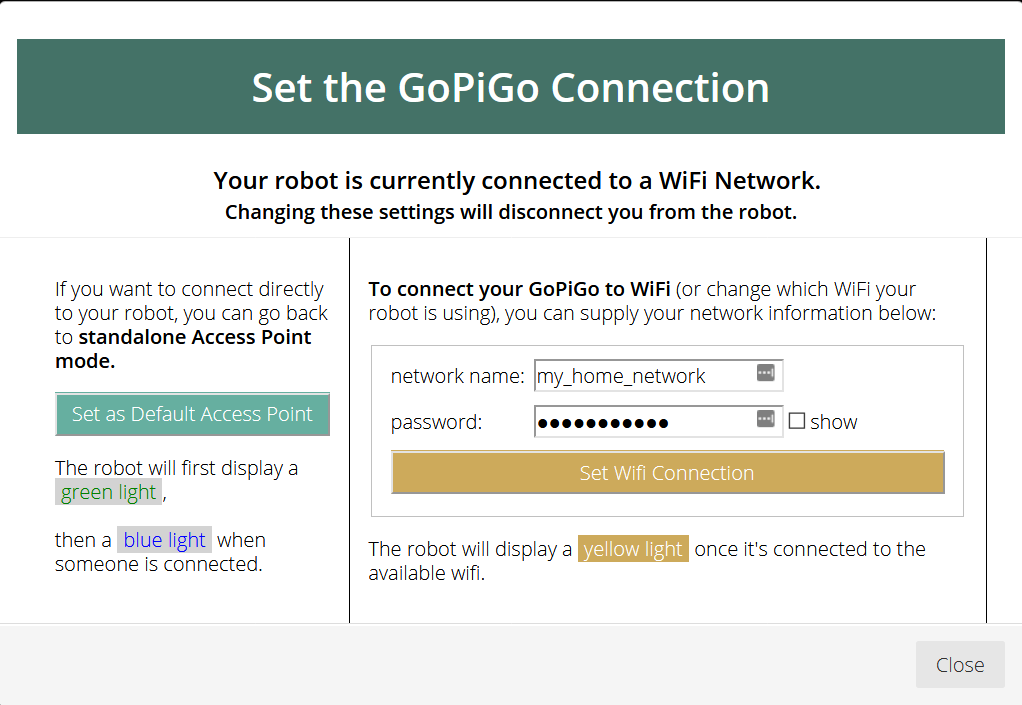
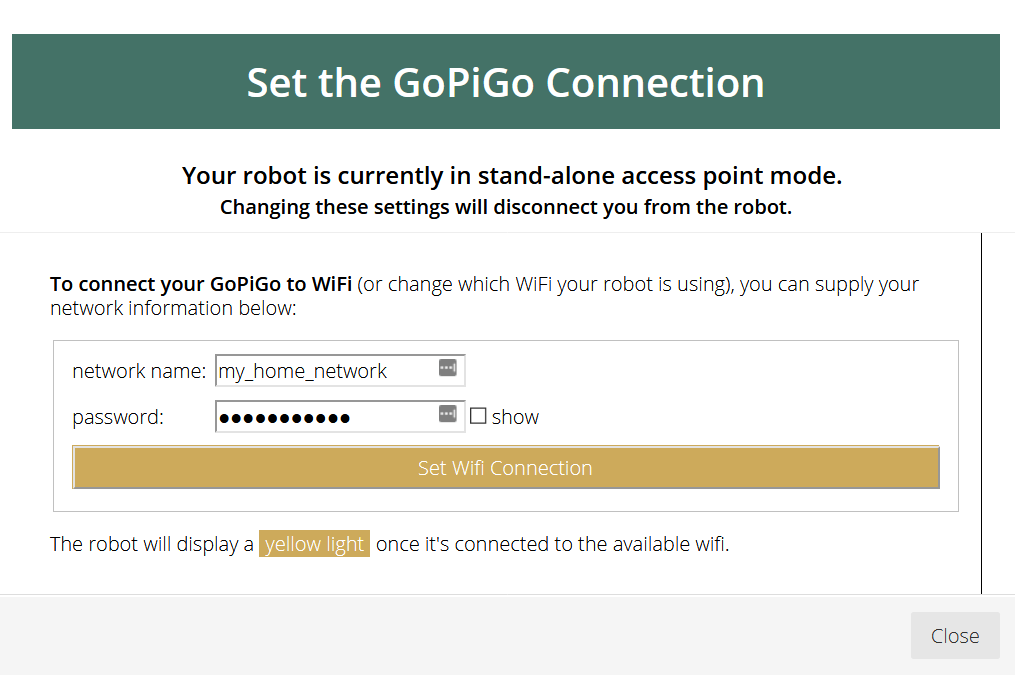
Heads up! If you go back and forth between Access Point and Network WiFi, be aware that there is a delay before the web interface catches up with the changes. The delay can be up to 30 seconds, which may feel like a long time! But eventually it will catch up.

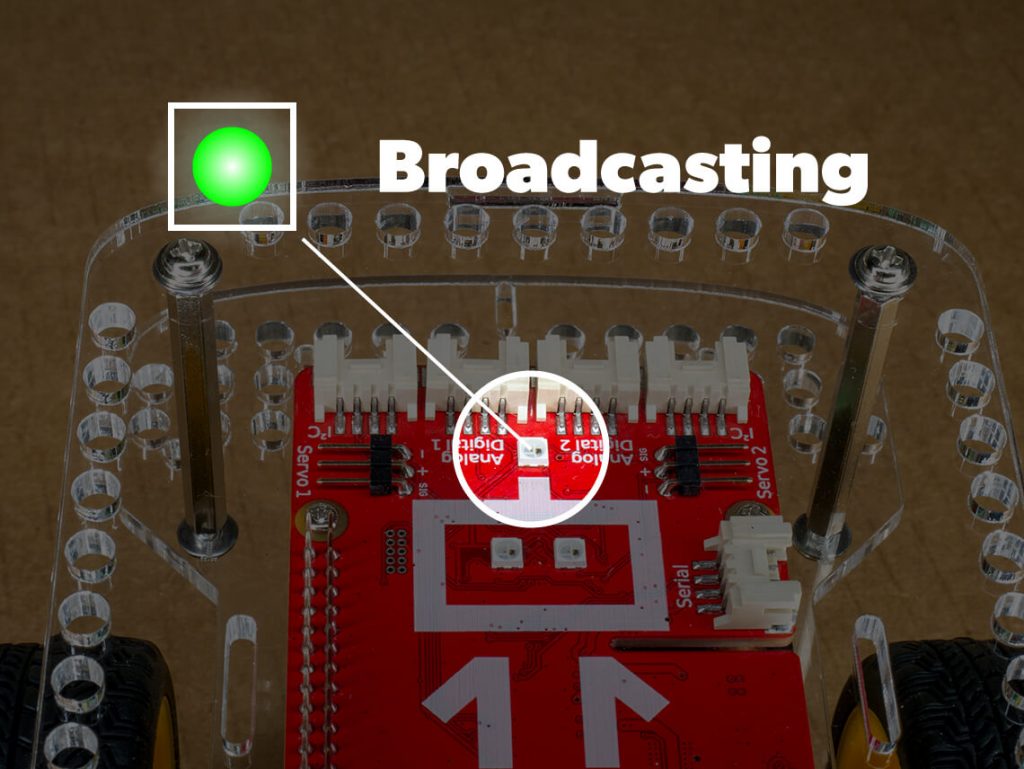
Every boot-up will be in Access Point mode, this allows you to take the robot with you, to school or a friend’s place, and always be able to talk to it.  For those of you who prefer to have your robot connected to your home or school wifi, It also means that on every boot-up you will have to connect to the robot access point and reconnect it to your home wifi.

If you *know for sure* that the robot will always stay in the same WiFi environment, you can disable the Access Point feature permanently. If you choose to disable it, you will not be able to access the GoPiGo unless you do it through the saved network. If this saved network is not accessible – if you moved the GoPiGo to another location for example – then you will no longer be able to connect with the robot.

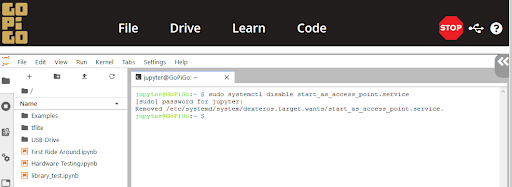
You can use  the terminal in the Python interface to disable the access point. Note that the jupyter user now has sudo access, and its password is still jupyter.

sudo systemctl disable start_as_access_point.service

Should you ever need to take the robot elsewhere, you will have to remember to run the following before you leave!

sudo systemctl enable start_as_access_point.service

If you forget, your only possible connection to the robot will be via an ethernet connection. That’s not always easy to figure out and our customer support team won’t be able to help out, as each system is different.
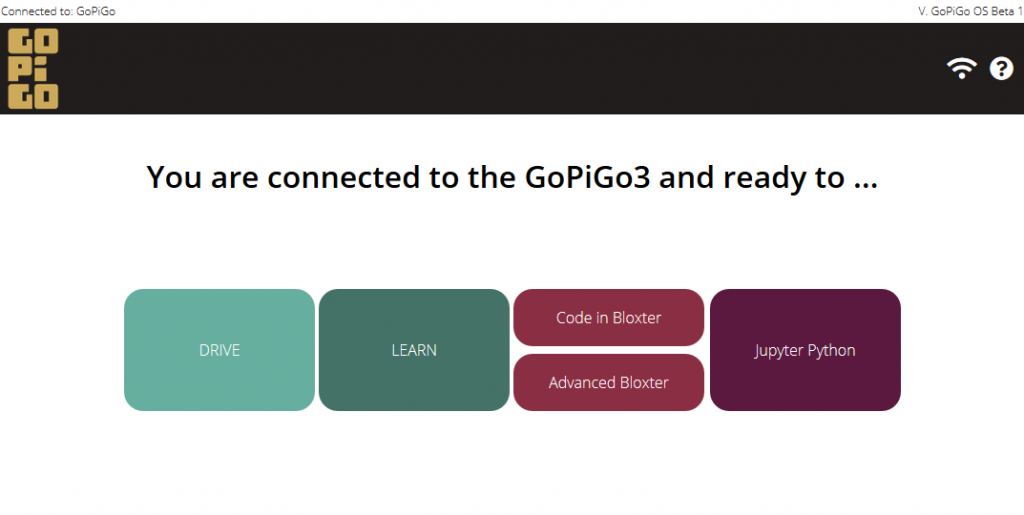
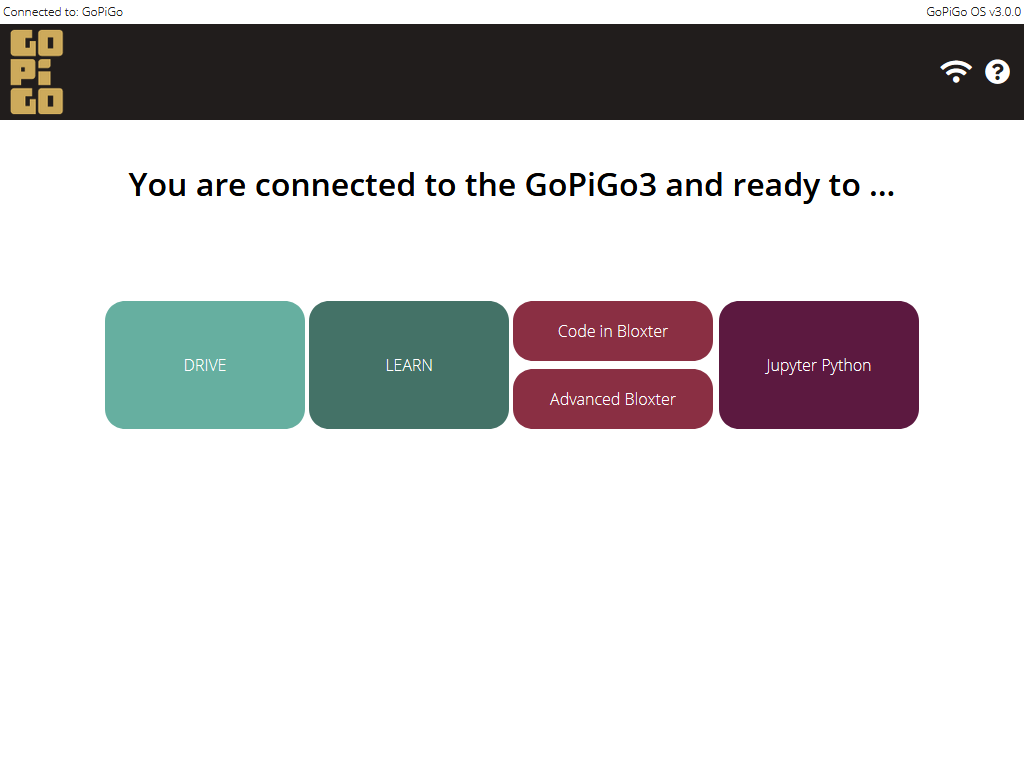
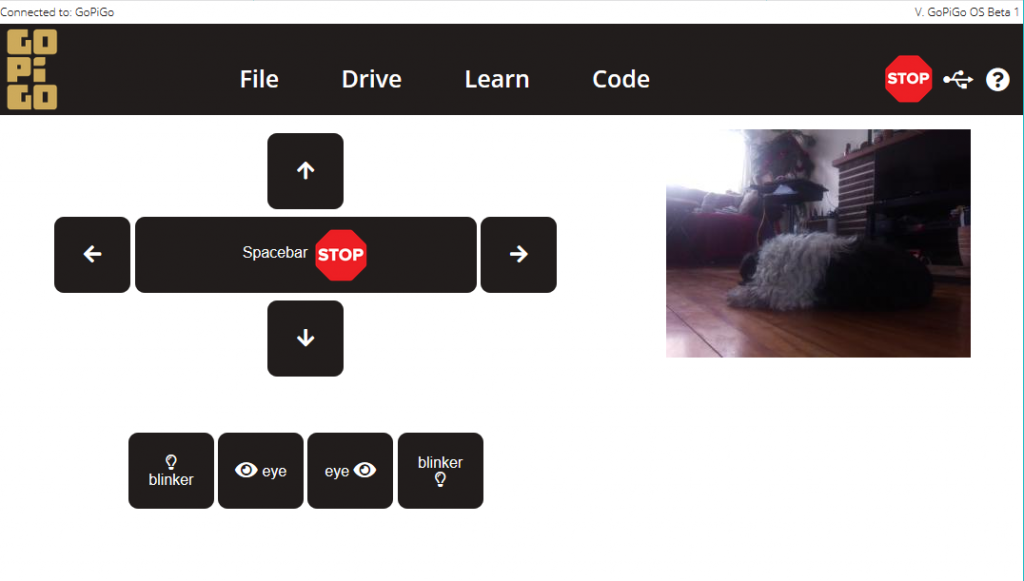
Using the Jupyter terminal to disable the Access Point.

Open Platform

GoPiGo OS is an open platform, just like the Raspberry Pi at its root!

You are free to SSH in, or connect using a VNC viewer to access the Raspberry Pi desktop.

How does GoPiGo OS compare with Raspbian for Robots?

  1. With the same SD card, you can use Bloxter with new coders,  a simple Python editor with intermediate coders and JupyterLab with your data scientists. No need to swap out cards in code clubs or camps.
  2. Note that GoPiGo OS doesn’t let you VNC into the robot by simply using a browser. A VNC viewer app needs to be installed  on your computer.

    If you are using a Chromebook, there is a VNC viewer you can install.

  3. The :1  that used to be necessary in Raspbian for Robots to connect to the VNC server is no longer needed. Just use the hostname or IP address directly.
  4. The password stays the same: robots1234
  5. The tools on the desktop are the same as in Raspbian for Robots.
GoPiGo OS desktop

There are a couple of limitations due to the fact that GoPiGo OS offers both a web interface and a desktop interface.

  • You cannot set the WiFi networking information through VNC. You first have to disable the access point via the browser as explained above in the WiFi Connectivity section.
  • You cannot unmount a USB drive through the normal desktop interface.
  • USB drives formatted with Ext-4 are not supported at this time.

Raspberry Pi 4 Support

Yes, GoPiGo OS supports all versions of the Pi4. It is indeed running a version of Raspberry Pi OS Buster (from Dec 2020) and all Pis can be used from the Pi2 and up!


Upgraded JupyterLab

JupyterLab has been the platform of choice for advanced applications like data science and machine learning. GoPiGo OS  is  currently  offering version 2.1.3.

This version has the much-asked-for search option!

JupyterLab offers interactive Python allowing you to run snippets of code in the order you see fit, shorterning development time, and letting new coders experiment without risks.


Using JupyterLab to search your code

Fresh Python Libraries

The Python libraries have been updated to newer versions.You can run a notebook that will let you know which versions are installed.

IPyWidgets is available to create interactive programs, and the main data science and computer vision libraries are available.

Please note that TensorFlow Lite is now pre-installed, and a face recognition library is also available.

(see https://pypi.org/project/face-recognition/)

Libraries and Versions

Drive Screen Upgrade

If your robot has a camera, the drive screen will let you have a robot-eyes view so you can pester your sleeping dog.

Combine this with the network WiFi option, and you can connect your robot to the internet and let long-distance friends play with your dog! (this requires changes to your home router).

You can also play with the LEDs although you can’t change the eyes color.


Drive Screen with Camera

Various Bits of Knowledge

First Boot Experience

Booting up GoPiGo OS for the first time will take a little bit of time. The robot needs to configure a few things when it first comes to life, and that includes a couple of reboots.

You will notice the antenna LED turn green, and a few seconds later it will turn off and the power LED will start blinking again. This is normal behavior. The robot will finish rebooting and you will be able to connect to it the second time the antenna LED shows up green.

Bloxter is Still Around

Bloxter loves its new home in GoPiGo OS! It is unchanged from DexterOS. Your previous programs will work just fine.

If you are a teacher, there is no need to modify your courses!

The sensor control panel is still available to help understand what is happening in the robot’s world.

Python 3 First

Python 2 support is dwindling and Python 3 is now the main version. 

Both Python3 (3.7) and Python 2.7 are on the SD card. However, if you simply type ‘python’ you will find yourself in python3, not in python2.

Wherever possible, Python3 is the default python. This is different than the default behavior offered by Raspberry Pi OS – Buster.

Battery Gauge

The battery gauge from DexterOS is gone.

The new Li-ion battery keeps a steady voltage for a long time and the need to keep an eye on the battery level is no longer required.

There’s plenty of power to last through a class or a workshop!

Rechargeable Battery - Talentcell

Version 3.0.3 Notes

Version 3.0.3 addresses the following bug fixes.

  1. The control panel can display distance sensor values without triggering errors.
  2. The buzzer is now able to play the B4 note.
  3. The Say block and Create Text block are now working together.

GoPiGo OS 3.0.3 was released in June 2022.

image

Version 3.0.2.1 Notes

Version 3.0.2.1 addresses the following bug fixes.

  1. It is now possible to use two distance sensors at the same time and get proper readings.
  2. USB drives with spaces in their name are properly detected. Please note drives formatted with the ext4 format are not supported.
  3. The print block in Bloxter now works properly.
  4. Steer, spin commands now take the robot speed into consideration.
  5. Support for Adafruit ICM-20649 and ICM-20948 is now available in Jupyter Python.

GoPiGo OS 3.0.2.1 was released in March 2022.

Version 3.0.1 Notes

Version 3.0.1 addresses two bug fixes.

  1. New version detects connected USB thumb drives during boot.
  2. Fixes some audio issues within Bloxter, namely the “say” and “play” blocks.
  3. Adds support for “16-tick” motors. Some GoPiGo motors were manufactured with more magnets than specified. This causes a robot to drive incorrectly when specifying specific distances. Use the calibrate your GoPiGo function to adjust tick settings.
 
GoPiGo OS was released in July 2021.

If you prefer to install version 3.0.1 instead of a newer version click the button to download.